
5 Ways to Create Gaussian Splats
Five ways to create Gaussian splats: phone, 360 camera, drone, LiDAR scanner and a single photo. Camera settings, capture patterns and publishing in Cyango.
- Gaussian splats
- tutorial
- capture
- drone
- 360°
A good splat is decided before you press record. Training uses the images you give it and nothing more. Every blurry frame, every person who walks past and every corner you skip ends up in the final scene.
This tutorial takes you from an empty room to a published splat. It covers five ways to create a splat, the camera settings, the movement patterns, the processing in xr/converter, and the fixes for the most common problems. If splats are new to you, read What Are Gaussian Splats? first.
How a splat is made
Every capture method feeds the same two steps.
First, pose estimation compares features across your frames. It calculates where each frame was taken and where the camera pointed. Second, training optimizes millions of small 3D Gaussians until their render matches your frames. xr/converter does both steps for you on a GPU server.
One rule follows from this. Training cannot invent a view that your camera never saw. Gaps in coverage become holes, smears and floating blobs. So the capture decides most of the quality, and most of this tutorial is about capture.
The five ways
| Way | Best for | What you capture | Effort |
|---|---|---|---|
| 1. Phone or camera | Objects, rooms, shops, small interiors | A video clip or a set of photos | Low |
| 2. 360 camera | Full interiors, corridors, fast walkthroughs | One 360 video | Medium |
| 3. Drone | Buildings, facades, roofs, sites | One flight per zone | Medium to high |
| 4. LiDAR scanner | Large or plain interiors, survey work | One walking scan | High |
| 5. Single photo | Concepts, backgrounds, old photos | One image | Very low |
A phone is enough to start. Steps 1 to 4 use a phone or a camera, and most of their rules apply to every way. Read them even if you plan to fly a drone.
Step 1: Plan before you record
Ten minutes of planning saves an hour of conversion and a second visit.
- Walk the space once without recording. Look for mirrors, glass, screens, and dark corners. Find the obstacles on your route.
- Plan one continuous route. Choose a loop that ends where it starts. Avoid dead ends, because you must turn on the spot to leave them.
- Remove what moves. Ask people to leave the area. Stop fans, close doors, and turn off screens that change. Moving things become floaters.
- Make the light even. Turn on all the lights. If the sun makes hard patches on the floor, close the blinds. Outdoors, bright overcast weather is best.
- Prepare the gear. Clean the lens. Charge the batteries and free some storage.
Step 2: Set up the camera
The camera must record the same scene the same way from the first frame to the last. Lock everything that can change on its own.
| Setting | Recommendation | Why |
|---|---|---|
| Resolution | 4K | More pixels give more features to match |
| Frame rate | 30 fps | Enough frames, with a faster shutter possible |
| Shutter speed | 1/120 s or faster indoors, 1/500 s or faster outdoors | Prevents motion blur while you walk |
| Exposure | Locked | Brightness changes confuse training |
| White balance | Locked | Color shifts create blotches |
| Focus | Locked at a middle distance | Focus hunting makes soft frames |
| Lens | The main lens (1x on a phone) | No digital zoom, less distortion |
| Stabilization | Standard | Strong modes crop and warp the frame |
| HDR and log profiles | Off | Record standard video with normal colors |
On most phones, press and hold on the screen to lock exposure and focus. For full manual control of shutter and white balance, use a pro video app. On an action camera like a GoPro, record in a linear or wide mode and keep the same mode for the whole clip.
Step 3: Move the right way
How you move is as important as what you point at.
- Move the camera through space. Do not stand still and pan. Pose estimation needs parallax, which means the camera must change position between frames. A clip that only rotates from one spot usually fails.
- Walk slowly. About half of your normal walking speed is right. Slow down more in dark rooms.
- Hold the camera steady. Use two hands and keep your elbows against your body. A gimbal helps.
- Turn smoothly. Sudden turns make blurry frames and break the overlap between neighboring frames.
- Do not fill the frame with the subject. Keep some context around it. Context helps pose estimation and gives you a clean background.
- Overlap a lot. Every part of the scene must appear in many frames, from different positions.
Step 4: Follow a capture pattern
A pattern makes sure that you see every surface from more than one height and angle.
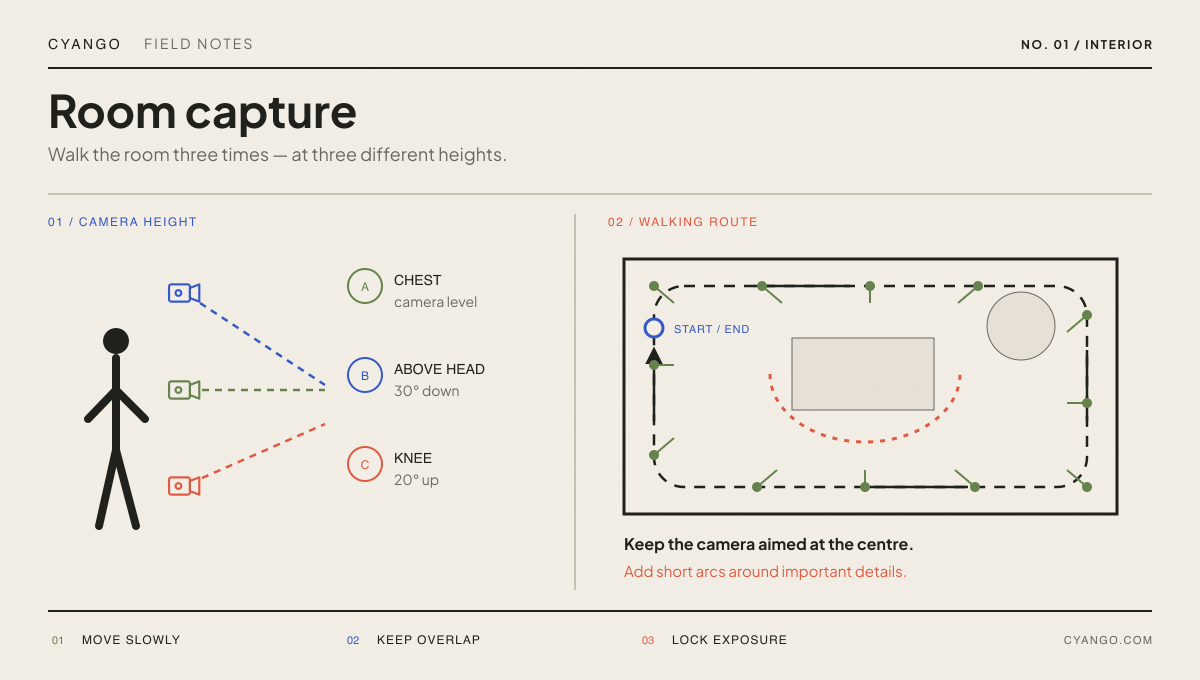
Pattern for a room
- Loop 1 at chest height. Walk along the walls and point the camera toward the middle of the room. Keep the camera level. Complete the loop.
- Loop 2 from above. Hold the camera above your head and tilt it down about 30 degrees. Walk the same loop again.
- Loop 3 from below. Hold the camera at knee height and tilt it up about 20 degrees. Walk the loop a third time.
- Areas of interest. Go closer to the details that viewers will inspect: a counter, an artwork, a product shelf. Move around each one in a short arc. Do not stop and zoom.
- Floor and ceiling. For a complete room, add one slow pass that points at the floor and one that points at the ceiling.
Pattern for an object
- Put the object on a surface with some texture. A plain white table gives pose estimation nothing to match.
- Walk a full circle around it at eye level.
- Walk a second circle with the camera high, tilted down about 45 degrees.
- Walk a third circle with the camera low, tilted slightly up.
- Finish with a slow pass over the top.
Do not use a turntable. On a turntable the object turns but the background stays still, and pose estimation cannot solve both.
How long to record
- One object: 30 to 60 seconds.
- One room: 1 to 2 minutes for the three loops, plus the detail passes.
- A large space: Split it into zones and record one clip for each zone. Each clip becomes its own splat. In xr/studio, you connect the zones as scenes.
Capture with a 360 camera
A 360 video sees every direction at once. One slow walk through a room covers what takes three loops with a phone. This speed has a cost.
An 8K 360 frame spreads 7,680 pixels across 360 degrees. That gives about 21 pixels per degree. A 4,000-pixel phone frame with a 70-degree view gives about 57. So a 360 camera wins on speed and coverage, and a normal camera wins on detail.
Follow these rules when you record:
- Mount the camera on a pole above your head. You are in every 360 frame. Height keeps you small and at the bottom of the image.
- Walk through the middle of the space. Keep a constant distance from the walls where possible.
- End where you started. A closed loop helps pose estimation connect the start and the end.
- Keep the stitch line away from important details. Turn the camera so that its sides, where the two lenses meet, do not point at the main subject.
xr/converter takes flat video. In your camera's desktop app, reframe the 360 clip into a flat video with a wide view of about 90 to 110 degrees. Turn on horizon leveling. Point the view at the subject, or let it follow your walking direction. Then upload the reframed clip like a normal video.
A reframe keeps only part of each 360 frame. To use all of it, train on your own computer with Spirula Studio, which reads 360 and equirectangular footage directly. See Step 5.
Capture with a drone
For buildings and sites, a drone is the only practical way to see roofs and upper facades. Any drone with a gimbal and manual exposure works.
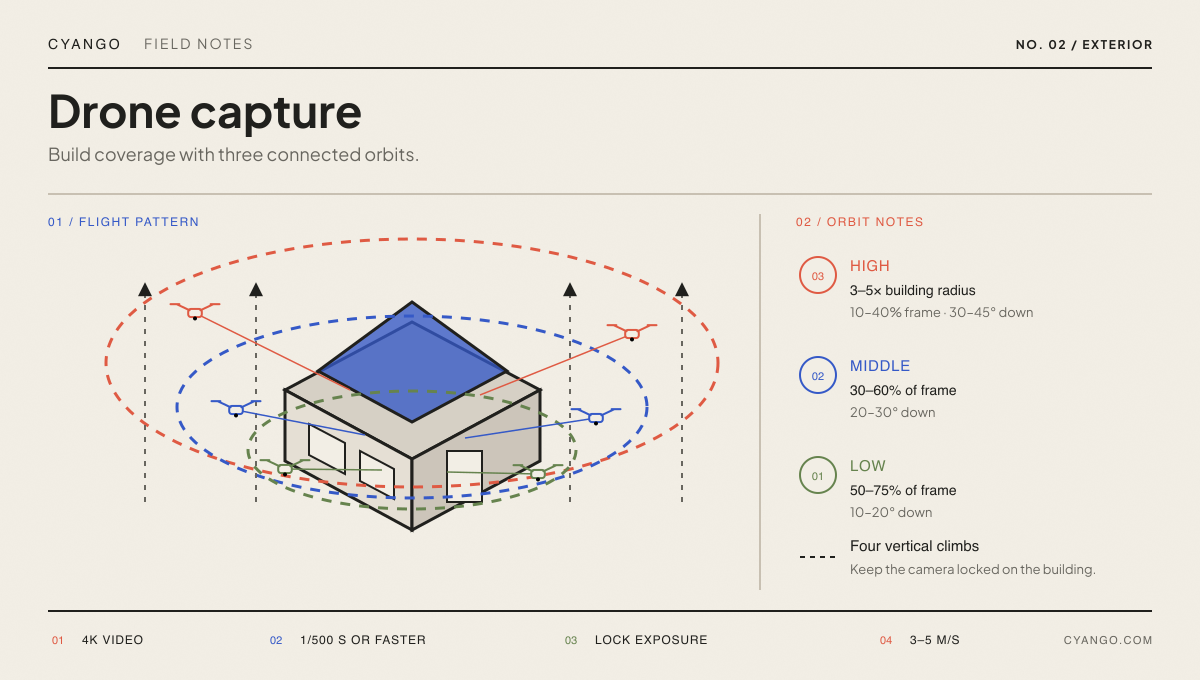
Drone camera settings
- Record 4K video at a shutter speed of 1/500 s or faster.
- Set exposure manually before takeoff and do not change it in flight.
- Use the main wide camera, about 24 mm equivalent.
- Fly slowly, at about 3 to 5 m/s.
Pattern for one building
- Low orbit. Fly a full circle close to the building. The building fills about 50 to 75% of the frame. Tilt the camera 10 to 20 degrees down.
- Middle orbit. Fly wider and higher. The building fills about 30 to 60% of the frame. Tilt the camera 20 to 30 degrees down.
- High orbit. Fly wider and higher again, at a radius of about 3 to 5 times the building's size. The building fills about 10 to 40% of the frame. Tilt the camera 30 to 45 degrees down.
- Vertical climbs. At four points around the building, climb straight up with the camera locked on the building. Start each climb at least at the height of the low orbit.
The building must never fill the whole frame. Between two orbits, its size in the frame must not drop by more than about half. If it drops more, the orbits do not connect.
Pattern for a large area
Fly a grid along the length of the area, then turn 90 degrees and fly it across. Tilt the camera about 45 degrees forward and down, so you get roofs and facades in the same pass. If the area needs more than one battery, split it into zones that overlap a little and convert each zone.
Weather and rules
Bright overcast weather is ideal. Hard shadows that move between orbits cause ghosting. Wind moves trees, and moving branches become floaters. Always check your local drone rules before you fly.
Capture with a LiDAR scanner
Handheld scanners combine LiDAR with cameras. They track their own position while you walk, so they do not depend only on image features. This makes them strong in large or plain spaces, like warehouses and white corridors, where video alignment often fails.
The capture rules stay the same: clear the scene, keep the light even, walk slowly and end where you started. The scanner software creates the splat. Export it as PLY and import it into xr/studio. The gear costs much more than a phone, so this way pays off when you capture large spaces often or need measured accuracy.
Create a splat from a single photo
Sometimes you have no time to capture, or the place no longer exists. Image → Splat in xr/converter predicts a splat scene from one JPG, PNG or HEIC photo.
The result looks good near the original viewpoint. If you move far from it, you find holes and invented surfaces, because the model guesses everything the photo does not show. Use it for concepts, backgrounds, quick previews and archive photos. Do not use it to document a real place accurately.
Step 5: Turn the capture into a splat
With a good capture, the processing is the easy part. You have two options: xr/converter in the cloud, or Spirula Studio on your own computer.
In xr/converter
- Open xr/converter and choose Video → Splat.
- Choose your video. Upload an MP4, MOV or WEBM clip.
- Choose the settings. Start with a preset:
- Draft is fast. Use it to check that your capture works.
- Standard is the right choice for most scenes.
- High Quality uses more frames, a higher resolution and more detailed reflections. It takes longer.
- Convert. Cyango runs the conversion on a GPU server. You can leave the page. The job stays in your Jobs list, and you can open it again from there.
- Preview your 3D scene. Orbit the splat in the browser. If it looks right, continue to publish it as a story.
Some settings are worth changing for special captures. All of them are in the Frames + Camera section:
- Max frames: Raise it for a large room or a long clip. More frames give more coverage, but the conversion takes longer and needs more memory.
- COLMAP camera model: Choose OPENCV_FISHEYE for GoPro and other action cameras with a fisheye lens.
- Sharpness keep fraction: Lower it for shaky footage. The converter then keeps only the sharpest frames.
You can save your own settings as a preset and share it as a file with your team. xr/converter is available on the Pro and Enterprise plans.
On your own computer with Spirula Studio
For photo sets, for full 360 footage, or when you want to keep the files on your own machine, we recommend Spirula Studio. It is free and open source, and one app does the full job: frame extraction from video, alignment, masking and training. You do not have to install Python or COLMAP. It runs on Windows, macOS and Linux, with NVIDIA, AMD, Intel and Apple GPUs. It also accepts fisheye and 360 footage, and it trains large scenes with little video memory.
For photos, shoot sharp images with about 70% overlap between neighbors. When the training is done, export the splat and import it into xr/studio.
Step 6: Check the result and fix problems
Orbit the preview and look at the edges of the scene, not only the center. This table lists the most common problems.
| Problem | Likely cause | Fix |
|---|---|---|
| Conversion fails with "could not reconstruct" | Too little camera movement, or too much blur | Move through the space instead of panning. Walk slower and add light |
| Floaters in the air | Moving people, cars, branches, or low overlap | Clear the scene. Walk slower for more overlap |
| Smeared or soft areas | Slow shutter or fast movement | Use a faster shutter. Lower the sharpness keep fraction |
| Holes | A view that you never captured | Add the missing loop or pass |
| Ghosts and color patches | Light or exposure changed during the capture | Lock exposure and white balance. Keep the light constant |
| Soft background | Only close shots | Add a wider pass that shows the surroundings |
| Weak facades (drone) | Only straight-down shots | Add tilted orbits |
| Out of memory | Too many frames or too high a resolution | Lower Max frames or the resolution cap |
If a problem comes from the capture, settings cannot fully fix it. Record the missing part again and convert again.
Step 7: Publish the splat
A splat file is an asset. A client, a visitor or a buyer needs an experience around it.
In xr/studio, you import PLY, SPLAT, SPZ or KSPLAT files, or you continue from the xr/converter preview. Cyango prepares it for web streaming with SOG compression and RAD levels of detail. Then you add hotspots, labels, UI, audio and more scenes. You publish one link that works in browsers, on phones, in AR and in WebXR headsets. You can even install the result for offline use.
For walkable AR or physics, run Splat → Collision mesh in xr/converter. It creates a watertight GLB mesh from your splat.
Plan the route, lock the camera, move slowly, cover every height, and let xr/converter do the rest.
Download now: cyango.com/download